How to build a DIY free sponge bottle filter for aquarium from homemade stuff?
Sponge filter allows water to flow through a sponge which removes debris & waste particles, & only clean water is allowed to pass through the filter for developing good bacteria. It can help in developing biological filtration. Sponge filters can be installed in a variety of tanks because they are available in different shapes & sizes, & have different pore sizes too.
In this tutorial, I will show you how to make a sponge filter for free using the supplies available at your home. A Sponge filter will use some basic supplies that all fish keepers should have at their homes, & obviously for creating bubbles for oxygenation an air pump is required.
I want to make good bacteria in my newly setup aquarium. I have already ordered a sponge filter for this aquarium but its delivery time is 3 days, & until then I will be using my free DIY aquarium sponge filter.
I have added all supplies & tools below to make a DIY aquarium sponge filter for free which can be operated with any air pump available at your home.
Supplies & tools required for making a free sponge filter:
- Disposable water bottle: Used to make the body of a sponge filter.
- Suction cup: Used for attaching a sponge filter to the aquarium.
- Air tube: Used to connect a filter to an air pump.
- Garden Hose: Use a piece of garden hose for pumping water out.
- Foam: Foam can provide filtration.
- Knife & Scissors: Can be used for cutting foam & pipe.
Step wise tutorial for making a free sponge filter for aquarium:
Read this tutorial, & learn how to create a free sponge air filter from scratch.I have provided a step wise tutorial about how to build a free sponge filter for a tank. Please read the steps about making a sponge filter which is used in my aquarium to provide biological filtration because I don’t have any fish.
Step 1: Use any plastic bottle & cut it in the middle:
Cut bottle using hobby knife
Use any plastic bottle available at your home for building a sponge filter. Cut the bottle in the center using a hobby knife.
Hint: If you face difficulty in cutting the bottle, then use a marker & make a circle across the bottle for a clean cut.
Step 2: Cut a small piece of garden hose:
Hint: A ruler can be used to measure the length of a garden hose, & make a clean cut using sharp scissors.
Step 3: Cut a hole in the sponge:
Cut a hole in the sponge for inserting a garden hose
Use a sponge for the base but first cut a hole in the sponge using scissors for inserting a garden hose, & it will give a good base.
Hint: Use a thick sponge because it will be easy to make a bigger hole for pushing garden hose inside. Measure the diameter of the garden hose, & use a sponge having greater thickness than hose.
Step 4: Setting up filtration media in bottle filter:
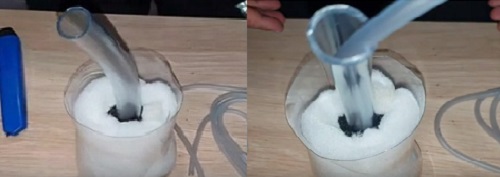
Setting up filtration media in bottle filter
Put the sponge in the middle of the bottle filter, & fill the surrounding area with fine foam. This foam can be used for biological filtration because there is no need for mechanical filtration in a fishless aquarium. Biological filtration is used to create good bacteria which is very important for a newly setup tank.
Step 5: Test sponge filter in aquarium:
Attach sponge filter to glass using suction cup & insert air tube in hose
Sponge filter is ready & it is time to test it in the aquarium. I have attached the sponge filter to the aquarium glass using a suction cup. I have connected the small pipe located in the middle of a big pipe to the air pump.
Step 6: How sponge filter works:
Filter is sucking water from sides - Water is pushed up through a pipe
The air from the pump is passing through the air tube, & leaving the filter through the garden hose which creates bubbles for sucking water from the aquarium. Turn on the power of the air pump to test the sponge filter. If the filter is pumping water out, then it means it is sucking water from the sides which goes down & pushed up through the big pipe.
It's time to celebrate:
Build a DIY free sponge filter in less than 10 minutes using above procedure. If you have enjoyed watching this tutorial, then don’t forget to provide feedback in the comment section below. Also you can watch my other videos about DIY Aquarium Filters.
Pros & cons of a Sponge Filter:
DIY Bottle filter tutorial is very helpful because it will show you the easiest way to build a sponge air filter for your tank that can help fish survive in case your main filter blows up. This filter is good for an aquarium where you want to keep baby fish because it will not suck them. There is an extra advantage of DIY sponge filters as it is easier to clean sponge filters than any other types of filters because other filters require higher maintenance. There is no chemical filtration zone in DIY sponge filters which is its biggest drawback. Hobbyists think twice when setting up an old sponge filter, which does not look attractive in a fancy aquarium.


Post a Comment