
How to Build a DIY Pond Filter with Waterfall Spillway from a Planter Box:
A filter will help you in
removing all the waste produced by fish & live plants as well as the debris
added to the water through other sources.
In this tutorial, I have
converted a planter box into a pond filter with a spillway. This DIY pond
filter with a spillway can be simply made at home, & the small version of
this project can be used as an aquarium filter. DIY pond filters can be used
for indoor & outdoor ponds. After finishing outdoor decking, I soon started
working on a DIY Pond filter with waterfall spillway so I can cycle the outdoor
pond, & introduce fish in the following weeks. Building the Pond filter was
simple & it took 2 days in completion, & I waited for about a week
until the glue fully cured. DIY pond filter is operated by a 10,000 LPH pond
pump, & contains around 24 Liters of bio media. Most of the bio media is
very porous like Seachem Matrix, Zeolite, & Ceramic Rings. Live bacteria
& Seachem Stability is added to quickly finish the nitrogen cycle.
How to Make a DIY Pond Filter with Waterfall Spillway from a Planter Box:
Filter box is a 80 cm planter
trough with a PVC spray bar pipe. For the inflow of the pond filter, I have
used male & female adapters. I have covered the pond filter inside a wooden
box created from treated pine decking board. I have double coated the timber to
save it from moisture & expand its life.
Step 1:

I have purchased a planter box
from the store. The planter box has the following dimensions: 80 x 39 x 34 cm.
I have removed the sticker from
the planter box.
Step 2:

I drilled a hole in the side of
the planter box. I have used a PVC pipe as a spray bar. I have chosen male
& female adapters for the inflow connections.
Step 3:

After drilling a hole in the side
of the planter box, I inserted the male PVC adapter from the inside of the
hole. The female PVC adapter is connected to the male PVC adapter from the
outside to seal the connections. This adapter is connected to the inflow pipe
that will draw water from the pond.
Step 4:

I have repeated the same
procedure for drilling another hole in the opposite side of the first hole.
Again, I have connected both male & female adapters for sealing the
connections. This adapter is sealed from the outside to stop water from overflowing the filter.
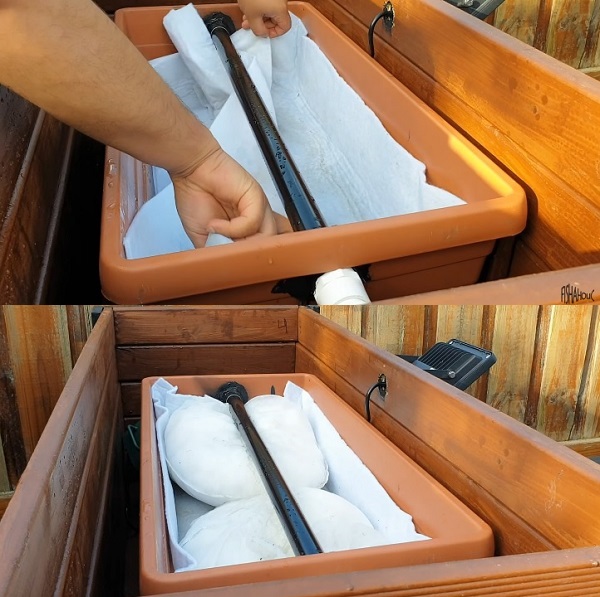
Step 5:

I have inserted a PVP pipe between both adapters. This PVC pipe is used as a spray bar.

I have drilled
many tiny holes in the spray bar to let water sprinkle over the mechanical
filtration media that I will later add to the filter.
Step 6:


I have used the filter tray for
marking the opening of the filter spillway. Then I softened the plastic to cut
it easily with a hobby knife.
Step 7:


I have used a plastic tray as a
spillway. On the back of the tray, I have made many small holes using a
soldering iron. I have also drilled holes in the bottom of the filter tray.
Water will flow from the filter to the tray using these holes. This tray acts
as a spillway that will allow water to flow back to the pond like a waterfall.
Step 8:

The planter I have used is self-draining
meaning it allows water to flow out from the bottom holes. I have sealed all
the holes in the bottom of the planter using silicone glue. I have connected
the spillway to the planter box.
Step 9:

I have cut the timber wood for
making a wooden frame for the planter box. This timber frame will fully cover
the ugly planter.
Step 10:

I have painted the timber wood to
extend its life. I have gently applied the paint to every side of the timber
wood using a paintbrush. Then I let the paint dry.
Step 11:

I have used screws for joining
the wooden pieces together. All pieces are gently joined together to make a
beautiful rectangular frame for hiding the planter box. I have added support at
the corner of the wooden box for extra strength.

I have added the planter box to
the centre of the timber box. I have pre-cut the timber wood cover at the
centre bottom for the spillway.
Step 12:

I have purchased an LED flood
light. Flood light should face the waterfall. I have drilled a hole in the
timber cover at top of the spillway for LED flood light. Through this hole, I
have pushed the wire. Hence, the wire of the flood light is hidden. I have
gently attached the flood light to the frame with screws. You can find
instructions on how to attach the flood light through its manual.
Step 13:

I have unboxed the media
containing good bacteria.
Ceramic Rings & Bio Bakki Balls:

I have added Ceramic rings to the
bottom of the filter. Ceramic rings are very porous & they are capable of
wiping out ammonia, nitrites & nitrates.
Bio bakki balls are very
efficient in removing toxic chemicals from the water.
Zeolite:

It will crystal clear your pond
water, & wipe out heavily polluted water. Its affinity for ammonium ions
makes it the perfect choice for the fish farms.
Seachem Matrix:

I have purchased Seachem Matrix,
which is very porous. Seachem Matrix allows colonization of both aerobic &
anaerobic bacteria for the removal of ammonia, nitrites & nitrates.
I have added bags of Seachem
Matrix & Zeolite to the filter.
Pond Prime:

Full & concentrated
conditioner for beautiful ponds. It can wipe out chlorine, & chloramine. In
addition, it can also wipe out ammonia, nitrites & nitrates from the pond
water.
Seachem Pond Stability:

Quickly & safely, setup your
pond filter with the help of Seachem Pond Stability. Your fish might die due to
non-completion of nitrogen cycle so you can use Seachem Pond Stability to fast
build-up of good bacteria. It also stops & lowers sludge build up. Seachem
Pond Stability can be used for wiping out ammonia, nitrites & nitrates.
I have added Seachem Stability,
which adds live bacteria to the filter.
Aqua Pro Booster Balls:

To fast finish the nitrogen
cycle, & to have heaps of live bacteria over your bio media, you can add
Aqua Pro Booster Balls.
I have added Aquapro Booster
Balls over the filtration media for treating up to 8000 Litres of water. It
will quickly release live bacteria.
For fast cycling, I have added
some Aqua Pro Booster Balls, & Seachem pond stability.
Step 14:

For mechanical filtration media,
I have used Hobby Fill Fibre Filling foam. I have filled two bags from the
foam.
Step 15:

I have placed two timber woods on
the side of the pond, & setup the filter on top of it.
The pond pump can draw 10,000
Litres of water in an hour. I have installed the submerged pond pump inside
water, & connected the outlet pipe of the pump to the inflow of the filter.
Step 16:

I have placed the wooden frame on
top of the filter. I have setup the pump controller for controlling the speed
of the water forced into the filter.
Step 17:
I have added filter media for
mechanical filtration. The sheets of the foam will trap all the solid waste
particles, & will stop debris from clogging the bio media.
Step 18:

My DIY pond filter has cleared the water within a week. I have introduced many fish to my newly built pond. My pond is heavily stocked but my DIY pond filter keeps the water clear.
Post a Comment