How To Build a Homemade DIY Canister Filter For Fish Tank:
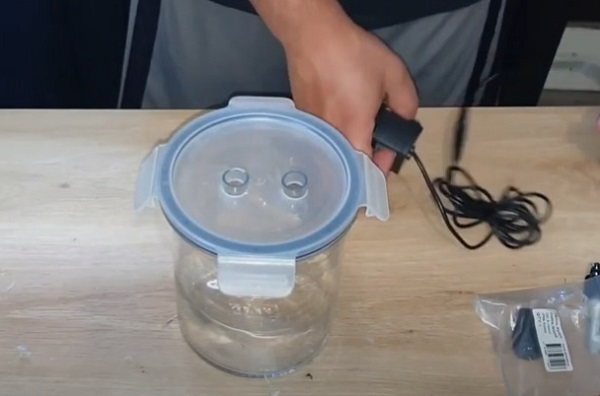
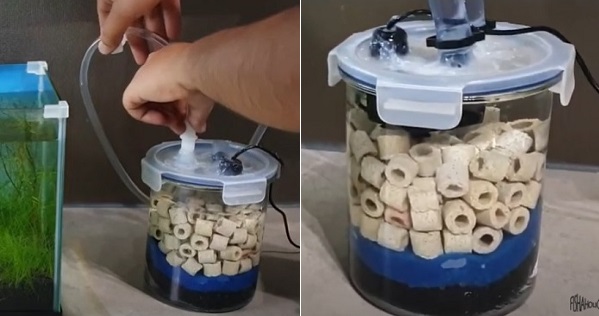
It is difficult to find the right size filter for a small aquarium in the market that cleans water efficiently. You always have an option to make one for your aquarium. My filter container can hold 1.7 liter of water & it is powered by a pump that runs at 200 L/H. Pump is connected to the inside of the canister filter. I am using a glass storage container & I have explained every step for making a canister filter in this tutorial. Make sure you test your container for leaks before start building the canister filter.
Steps: Build a DIY canister filter for fish tank from homemade stuff:
I have purchased the container,
vinyl tube, submersible pump, tube joiner, elbow connectors, & other tools required for building a
homemade DIY canister filter.
Materials:
- Vinyl Tube
- Submersible Pump 200 L/H
- Vinyl Tube Joiner
- Cable Gland
- Plastic Elbow Connector
- Glass Container
- Suction Cups
- Silicone Glue
Step 1: Leak test:
Half fill the glass container
with water. Close the lid & shake the container to test for any leaks. If
your container is leaked then the inside water level will drop.
Step 2: Drill 2 holes in the container lid:
Remove the unwanted labels from the
glass container & lid. I have drilled 2 holes in the plastic lid of the
glass container for inflow / outflow connectors. Use a sandpaper for smoothing
the rough edges.
Step 3: Insert both inflow / outflow vinyl tube joiners:
Cut vinyl tube joiner in half to
make it 2. Insert each joiner in each hole of the lid.
Pump will create pressure inside
the container which will draw water from the aquarium & water will be
pumped back to the aquarium using an outflow vinyl tube.
Step 4: Drill a hole for the cable gland:
Drill another hole in the lid for
the cable gland. A cable gland is a sealing device so pass wire through the
cable gland & lock the cable gland to seal proof your container.
Step 5: Attach a submersible pump:
Connect a pump to the outflow
vinyl tube joiner from the inside. It will force water back to the aquarium
& will create a strong suction force which will draw water from the
aquarium using an inflow tube.
Step 6: Seal connections using silicone glue:
Connections are sealed using
silicone to make them waterproof. Wait until the glue completely seals. Apply a
layer of silicone on both inflow & outflow pipes as well as the cable
gland. Different silicone glues have different bonding time. You will find the
bonding time on the silicone glue tube.
Step 7: Straighten vinyl tubing:
Straighten vinyl tube by placing
it in hot water for up to 20 seconds. It is very easy, just fill the sink with
hot water & place vinyl tube in hot water for some time.
Step 8: Setup internal tube of the canister filter:
Connect an elbow plastic
connector to the bottom end of a vinyl tube & attach the top end of the
vinyl tube to the inflow tube joiner from the inner side. Dirty water drawn
from the aquarium will be pushed down to the bottom of the canister filter
using this internal tube. Water will start rising upward inside the canister
filter. It will first pass through the mechanical media then it will flow
through the bio media before a pump catches clean water & forces it back to
the aquarium.
Step 9: Mechanical filter media:
I am using mechanical filtration
media as well as bio media in my DIY homemade canister filter. Mechanical media
includes coarse & medium foams. All large solid waste particles will be
stopped by coarse foam while small particles that are able to cross the coarse
foam will be stopped by medium foam. I am using ceramic noodles as bio media which
is very porous & it allows heaps of useful bacteria to grow on its surface which
keep water free of toxic chemicals.
Coarse foam should be setup
before medium foam because medium foam gets clogged quickly if it traps large particles.
Make a hole in both coarse & medium foams. Pass the plastic elbow connector connected to the vinyl tube through both foams.
Step 10: Bio media:
I am using ceramic rings as the
only bio media. Another name of ceramic rings is ceramic noodles. They are used
for growing heaps of nitrifying & denitrifying bacteria. Heaps of good
bacteria will colonize on the ceramic noodles because they offer lots of
surface due to its porous media.
Nitrifying bacteria breaks down ammonia into nitrites & then into nitrates. Nitrates are less dangerous
than nitrites, & nitrites are less toxic than ammonia. Presence of high
levels of nitrates is still toxic to aquarium fish.
Denitrifying bacteria consumes
nitrates. They live in oxygen free areas. Tiny little pores in the ceramic
noodles do not allow air to enter so denitrifying bacteria live inside these
pores.
Add ceramic rings on top of the
foams.
Step 11: Fill canister filter with water:
Add water to the canister filter.
Completely fill the canister filter before turning on the submersible pump.
Step 12: Attach inflow / outflow tubes:
Connect vinyl tube to inflow / outflow vinyl tube joiners of the canister filter. Attach a
plastic elbow connector to each of the opposite ends of vinyl tubes for drawing
& pumping water back to the aquarium. Use suction cups for fixing both
inflow & outflow tubes against the tank glass. Shake the filter to help
trapped air to escape.
Why canister filters be air tight?
Canister filter will not work if
it is not air tight. It will not work if pressure inside the
filter is not enough.


Hi
ReplyDeleteI am planning on building this filter. One question though,is it self priming?
Thanks
Post a Comment